MariosBikos
-
Posts
78 -
Joined
-
Last visited
Content Type
Profiles
Forums
Gallery
Blogs
Events
Store
Downloads
Everything posted by MariosBikos
-
 The HTC VIVE Tracker allows you to not only track objects in VR (getting tracker pose in real-time) but also use the POGO pins to simulate input buttons (Grip/Trigger/Trackpad/Menu) as if you were using a Vive controller. In this post I am going to show you how to do both using Unreal Engine 4.24. We will showcase 2 different scenarios: Scenario 1: we will only use the position and orientation of the Vive Tracker in the engine, without adding any input command events for the Pogo Pins. In this case, 2 Vive controllers will handle the user input while the tracker’s pose will be updated in the engine according to the physical device. Scenario 2: we will use the Vive Tracker's pose and and detect input commands from the POGO pins. At the moment there is a limitation with SteamVR Input so you can’t get input simultaneously from 2 Vive Controllers and a Vive Tracker. Therefore you will need to use 1 Vive Controller and a Vive Tracker or just a Vive Tracker depending on your application use case. You can use 2x controllers and simultaneously get input from connected trackers, as long as you use SteamVR 1.16.8 or a newer version. In both cases we will need a Vive Tracker. If you haven’t used a Vive Tracker with SteamVR before, you will need to pair the Vive Tracker with SteamVR so that it can be recognised as a tracking device in the SteamVR console. To do that, go to Devices → Pair Controller and a window will pop up asking you to pair an HTC Vive Controller. In this case, we want to pair a different type of device ( a tracker) so you need to click on the button “I want to pair a different type of Controller” and select the HTC Vive Tracker from the available options. After that press and hold the vive tracker System Button (where the Vive logo is) until the device is paired. You will be able to see the vive tracker on your vive console. Scenario 1 (POSE TRACKING ONLY) Tracker Pose.mp4 So let’s start with our Unreal Engine Project for the 1st scenario. If you don't like to read instructions here is a video instead. First of all, we will use a Blueprint Pawn named “VRPawn” and add 2 MotionController Components, one for each of the Vive Controllers. For the Right Controller, we will set the Motion Source to “Right” and for the Left Controller to “Left”. We will also tick the box that automatically renders the device model for us in the application. We will also add a MotionController Component for the Vive Tracker. In this case, we need to set the Motion Source to “Special 1” as this is the motion source used for Vive Trackers. If you try to play in VR Preview you your project, you will notice that the pose of the vive Tracker is not updated. That’s because SteamVR hasn’t set the pose of the Special1 Motion Source to be updated for the Vive Tracker properly yet. Here’s how to do this: Right-Click on the Vive Tracker logo and select “Manage Vive Trackers”. The SteamVR Settings window will open and you need to click Manage Vive Trackers again. You will then be able to see the currently active tracker and pick a role for it. For scenario 1 we will use the option “Camera” since we only want to use the Vive Tracker for its pose. So the Vive Tracker Role is now set to Camera and the Unreal Engine Project’s Motion Controller for our Tracker expects a Special1 Input Source. But how do we connect the 2? We need to open the SteamVR controller Bindings menu by clicking on Devices → Controller Settings and then selecting “Show Old Binding UI”. This window will allow us to define the input bindings for our UE4 project. Make sure that you have played the VR Preview at least one so that you can see the project in the available options as the menu will show you the most recently played applications. Now click on the Current Controller button(this is usually set to the Vive Controller by default) and you will see all the available options. Select the "Vive Tracker on Camera" to update the current controller. Now click the Edit button for the current Binding, or create a new Binding if you can't see that option. Next, click the "Edit Action Poses" button and a new popup window will appear. That's where you will need to assign the right hand raw pose to Special 1. That’s it! Close the window and play the VR Project in VR Preview again and you will notice that the Vive tracker pose is updated properly while running the application. You can now attach any component, e.g a static mesh and make it follow the vive tracker pose. SCENARIO 2 (POGO PINS INPUT) TrackersPOGO_UE424.mp4 in this scenario we will use 1 Vive controller (as the Right Controller of the user) and 1 Vive Tracker, but the Vive Tracker will also be able to send input to the UE4 Project via the Pogo pins. Using the same simple UE4 Project, create a new Input Action in Unreal Engine's Project Settings Input menu. This action event will be triggered every time a controller command is sent from the pogo pins and depending on the SteamVR bindings. In this case I named the action “TrackerAction” and added as key input the Vive Trigger, just to make sure that the Action will then be available in the SteamVR binding menu and so that it can be re-assigned to one of the vive tracker Pogo Pin. The only way to get input from the Vive Tracker's POGO pins in this scenario is to change the tracker role to “Held in hand” and select Left/Right depending on how we plan on using the Vive Tracker. Now let’s go back to SteamVR Input Bindings UI and select the “Vive Tracker in Hand”. In this case you will need to "Create New Binding" for this type of controller input. We can now bind the TrackerAction we created in the UE4 Project to one of the available key bindings (Power/Trigger/Grip/Menu/Thumb). Since the tracker role was set to Left Hand, you will need to pick from the left hand menu options. In this case, I added the TrackerAction as a Trigger input button. That's all! If you now use a cable to connect pins 2 + 4 together (Ground+Trigger button), the Trigger button key input command will be sent to SteamVR and SteamVR will trigger the BP Event we created earlier in our UE4 Project, printing "hello". Keep in mind that there is a limitation at the moment, since OpenVR won't allow you to use input from the POGO pins while 2x Vive controllers are already in use. Also, in Scenario 2, you need to make sure that SteamVR only has 1x controller(and not both controllers active) and 1x tracker activated and that the controller tracked is actually the Right Controller. To figure this out easily, you can try to turn on both controllers and the tracker and then turn off the controllers one by one until you can see 1x tracker and 1x controller being tracked at the same time by Unreal. You can use 2x controllers and simultaneously get input from connected trackers, as long as you use SteamVR 1.16.8 or a newer version.
-
Hi @zian1998zian, the SRWorks SDK v0.8.0.2 was not compatible with UE4.24 however if you try the latest SRworks version v0.9.0.3 that is available here: https://developer.vive.com/resources/knowledgebase/vive-srworks-sdk/ you should be able to use it with UE4.24. Make sure that the Experience_UnrealEditor.Target.cs file has the line with bForceEnableExceptions = true; commented out and you should be good to go!
-
Shouldn't the declaration of the function be SetLicenseChecker instead of SetetLicenseChecker? @Sveni.412
-
Ok this sounds more like a post for the Unreal Engine forum and I can see you already posted it there (so good thinking there). If the bInit is indeed declared as a data member of the ViveportApiDemo then you can access the bInit variable from any function of the ViveportApiDemo class and change its value if you wish to. Make sure the variable is declared as a data member of the class and not as a global variable! Based on my experience with Unreal Engine here is what you can do to communicate between Blueprint and C++. - You can call a function in C++ that has a UFUNCTION(BlueprintImplementable) specifier in which case you can call the function from C++ but define what the function will do in Blueprints. - You can use a UFUNCTION(BlueprintNative) specifier in which case it's like the case above but they can also have a C++ implementation. I hope this helped. The Unreal engine forum may be better for similar questions unless you have a question speficially about the viveport API.
-
Hey @Sventozz, can you elaborate a bit more on what you are trying to achieve? Have you added the bInit variable and now you can't access it within the OnSuccess function? Is your bInit inside a class?
-
Glad that it worked @dagillespie. You are right, we will update the documentation and eventually the plugin's code to make sure these changes are included.
-
Eye Tracking SDK (SRanipal) for UE4
MariosBikos replied to komnidan's topic in VIVE Eye and Facial Tracking SDK
Hey @komnidan, regarding SRanipal in Unreal as @VibrantNebula said, there is .html documentation with all the available classes/namespaces/functions and there are Sample Levels inside the UE4 SRanipal plugin that can help you with Eye Tracking. They are located inside the plugin itself. There is also a .pdf document with instructions on how to set up the plugin in Unreal. We will soon post some tutorials on Getting Started with Eye Tracking in Unreal Engine as well. There is also an webinar tomorrow and you can register for it here: https://attendee.gotowebinar.com/register/3864979489729227788 -
Hi @dagillespie, sorry for taking too long to reply on this one, but I think I can definitely help you with that. I can re-assure you that we are doing our best to make sure we support the latest Unreal Engine versions. Can you elaborate a bit more on the issues you are facing so that I can help you? Are you getting compile errors? If you are getting a compile error about the DartBoard.h file path not being able to be included then please make the following change in the SRanipal.Build.cs file:
-
Hi @AnanyaSairaj can you elaborate a bit more on what you need to do with the time stamped data. And what exactly do you mean with the term characters? Do you mean the Actors in your Unreal Scene? If you want to use SRanipal in your own UE4 project then you will need to copy and paste the SRanipal Plugin(found in SRanipal_SDK_1.1.0.1\03_Unreal\Vive-SRanipal-Unreal-Plugin\Plugins) in your Project's Plugin folder or create a new Plugins folder inside your project folder structure and paste it there. You can also find a document inside the SDK you downloaded called "Getting Started with SRanipal in Unreal Eye" that has more information. At the moment, you can use different functions to get features such as pupil position/diameter, Eye openness, Gaze Ray, Focus object, Eye Blendshape morphs,etc. If you want to learn more thingd about Eye Tracking with SRanipal SDK you can also register for our webinar here: https://attendee.gotowebinar.com/register/3864979489729227788
-
VIVE Foveated Rendering Plugin Released
MariosBikos replied to Corvus's topic in VIVE Eye and Facial Tracking SDK
@andreyg Here is the answer to your question: -
Interesting, in my case I was using a binary version of the engine. Are you using the 4.24 Release branch? Or a different stream from Epic Games? This was tested on a laptop with RTX 2070 so RTX 2080Ti should work for this. I can double check on a different setup and update you on this.
-
Hi @4GD, yes everything is working fine for me using 4.24 and after making the required changes to the enum. I will try again and try to reproduce the issue you are having locally. Is there anything else I should try? Also did you manage to enable the Cameras via the SteamVR interface? Have the cameras passed the test?
-
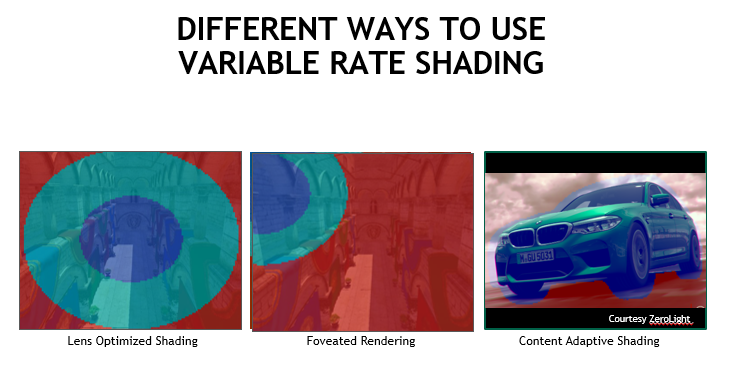
In this post, I am going to show you how to integrate Variable Rate Shading (VRS) with your Unreal Engine project in order to enable Foveated Rendering using the HTC Vive Pro Eye headset. This article is going to focus on Unreal Engine. If you are using Unity instead of Unreal Engine then you can use the Vive Foveated Rendering plugin from the Unity Asset Store or the Github page. It is assumed that you’re somewhat familiar with Unreal Engine, C++ and Blueprints. Requirements HTC Vive Pro Eye headset VR Ready Quadro (Quadro Desktop: Quadro 4000 card and higher, Quadro Notebook: Quadro 3000 and higher) or VR Ready GeForce Turing based GPUs ( GeForce™ RTX 20 series or GTX-1660 / GTX-1660 Ti ) NVIDIA Driver version: 430.86 or later OS: Microsoft Windows This post is divided into 4 main parts: Part 1 – Foveated Rendering & NVIDIA Variable Rate Shading (VRS) Part 2 – Setting up Unreal Engine Source Code from the Vive Github Repository. Part 3 – Setting up SRanipal Plugin Part 4 – Combining everything for Foveated Rendering results So, let’s get started! Part 1 – Foveated Rendering & NVIDIA Variable Rate Shading (VRS) Allow me to begin by stressing the importance of Foveated Rendering and how beneficial it can be for VR applications. Creative directors and technical artists always try to raise the bar of visual fidelity of immersive VR applications, but the engineering teams often hit the bottleneck of achieving the required minimum of 90 FPS as new headsets are released with better and better display resolutions. From time to time some new smart rendering techniques are invented that allow us to optimize this process without having to drop the quality. This is where foveated rendering comes in to play. If you’re not already familiar with the term Foveated Rendering, what you need to know about it is that it is a rendering technique that can be used together with VR Headsets that support Eye Tracking, such as the HTC Vive Pro Eye, to reduce the rendering workload, thus allowing developers to improve the performance of their VR applications or push the visual quality of their content. The term “Foveated” derives from the word Fovea, the part of the eye retina that allows us to have a sharp central vision (Foveal Vision) which lets us focus on the visual details of what is important in a narrow region right in front of us. The Foveal and Para-Foveal areas cover a field of vision of about 5 degrees. Anything outside the fovea region belongs to the peripheral vision and despite the fact that it is also useful, it can only detect fast-moving content changes and color, hence why it feels comparatively less detailed and blurry. The Foveated Rendering technique exploits the anatomy of the human eye and suggests that computers can drop the quality of graphics in the peripheral vision by lowering the resolution there while focusing all of the available processing power on the smaller foveated area of the image. VRS_01_v008_white_logo.mp4 Dynamic (Eye-Tracked) Foveated Rendering should not be confused with a variant called Fixed Foveated Rendering. The latter assumes forward viewing direction and limits the rendering costs of display areas which will not be clearly visible in the headset mainly around in the lens distortion region. Although the concept of Foveated Rendering has been around for a while, the new NVIDIA Turing™ architecture for GPUs allowed the use of a rendering technique called Variable Rate Shading (VRS) that can enable this feature. This technique offers the ability to vary the shading rate within a frame and can be combined with Eye-Tracking data to perform Foveated Rendering in VR experiences, hence why you need a GPU that is based on Turing™ architecture. Graphics cards have a component called pixel shader (or fragment shader), that determines the visual characteristics of a single pixel in a virtual environment such as its color, brightness, contrast, etc. Instead of executing the pixel shader once per pixel, with VRS the GPU can not only apply a single pixel shader operation to a whole 16 x 16-pixel region but also dynamically change the shading rate during actual pixel shading in one of 2 ways: Coarse Shading. Execution of the Pixel Shader once per multiple raster pixels and copying the same shade to those pixels. Configurations: 1×1, 1×2, 2×1, 2×2, 2×4, 4×2, 4×4 Super Sampling. Execution of the Pixel Shader more than once per single raster pixel. Configurations: 2x, 4x, 8x For example, in the case of Coarse Shading, we can select a 2×2 coarse shading that indicates that a single shade operation evaluated by a pixel shader invocation will be replicated across a region of 2×2 pixels. So instead of sampling 4 times for each pixel in the 2×2 area, we can sample once and broadcast the result to all 4 pixels. On the other hand, Supersampling is a method that enables increased sharpness and better anti-aliasing on high-frequency textures not possible by simple MSAA. The pixel shader is run at every sample location within a pixel instead of just once per pixel. With VRS, a VR application doesn't need to perform supersampling on the entire render target, as a specific region can be selected instead, minimizing the performance impact. Shading rate such as 4x Supersampling indicates that pixel shader will be invoked upto 4 times evaluating upto 4 unique shades for the samples within 1 pixel. This is really useful and provides a smoother immersive VR experience for the users especially when they need for example to read text in VR. This fine level of control enables developers to combine varied shading rates and gaze tracking capabilities for foveated rendering. Besides Foveated Rendering, NVIDIA VRS supports the following 2 techniques: Content Adaptive Shading that takes into account factors like spatial and temporal color coherence and object variation every frame to lower the shading rate in successive frames, e.g for areas where detail remains unchanged from frame to frame, such as sky boxes and walls. Lens-Optimised VRS that can be used to render efficiently to a surface that closely approximates the lens corrected image, eliminating the need to render pixels that would otherwise be discarded before output on the headset, exploting the fact that lenses are designed to be sharper at the center and blurrier around the periphery. It is worth mentioning that all 3 techniques can be used in unison for ultimate customization, and there is no limit on how much supersampling and coarse shading can be done per frame by the developers. Part 2 – Setting up Unreal Engine Source Code from the Vive Github Repository. Usually, most engineering teams that use Unreal Engine for VR development have to make a choice depending on the VR project they will work on and the flexibility they need. They can use: a binary version of Unreal Engine provided from Epic Games via the Epic Games Launcher. In that case, the Engine can’t be modified and only binary plugins that are verified to work with that version of Unreal Engine can be used. This is usually the case if you want to build quickly a demo using technologies/features that are already supported out of the box. the source code of a specific version or branch of Unreal Engine. The engineering team can introduce entirely new features in their custom source code of Unreal Engine to reach their goals for a project. For example, if Unreal doesn’t support a feature, the engineers can modify the source code of the engine to introduce this feature. Or if they find a bug in Unreal Engine that has not been fixed yet, they can fix it themselves without the need to wait for Epic Games to fix it. Most engineering teams that work on projects with new technologies usually prefer the 2nd option. This gives them more control over their pipeline. Currently, if you want to integrate VRS and Foveated Rendering in your Unreal Engine project you need to download and use a custom modified version of the Unreal Engine source code from the HTC Vive Github Repository. HTC Vive currently supports 3 different versions of Unreal Engine for Foveated Rendering, so there is a branch for UE 4.21.0, another branch for UE 4.23.1 and one for UE 4.24.2. Don’t forget that in order to be able to access the Unreal Engine Source code repository, it’s required to link your Epic Games account to GitHub account and get authorized by Epic Games. This modified version of Unreal Engine contains: Changes to the Unreal Engine Rendering Pipeline source code to support VRS for certain render passes. The VRS Plugin that comes with NVIDIA API libraries We realize that you may want to integrate Foveated Rendering in your project and you may be using a binary/installed version of Unreal Engine or a different custom version of Unreal Engine. HTC Vive is working closely with NVIDIA and Epic Games to make this process easier in the future by integrating the required engine changes to the official Unreal Engine branch so that only the VRS plugin will be needed without any further modifications. For now, if you or your team already use a custom Unreal Engine source code for versions 4.23 or 4.21 and you don’t want to switch to a different engine, you can copy the changes we made in the Unreal Engine Rendering pipeline source code and of course, add the extra VRSPlugin. It’s only a few lines of code! More specifically, for Unreal version 4.23 we had to make changes to the following files: Engine/Source/Runtime/Renderer/Private/ScenePrivate.h Engine/Source/Runtime/Renderer/Private/PostProcess/PostProcessing.cpp Engine/Source/Runtime/Engine/Public/SceneViewExtension.h On the other hand for UE 4.24 we modified the following files as we had to call VRS functions from the RHI thread and not the Rendering thread: Engine/Source/Runtime/Renderer/Private/ScreenSpaceRayTracing.cpp Engine/Source/Runtime/Renderer/Private/ScenePrivate.h Engine/Source/Runtime/Renderer/Private/PostProcess/PostProcessUpscale.cpp Engine/Source/Runtime/Renderer/Private/PostProcess/PostProcessMaterial.cpp Engine/Source/Runtime/Renderer/Private/DeferredShadingRenderer.cpp Engine/Source/Runtime/Engine/Public/SceneViewExtension.h You can choose to download the source code branch as a .zip file or use Github Desktop to clone the repository locally. We recommend using Git to clone the repository, since this way you can quickly fetch the latest updates and bug fixes and update your local copy every time the HTC Vive engineers push a change. Here is the list of steps required after you download the custom Unreal Engine source code in order to get the Engine up and running: 1. If you downloaded a zip archive of the code, extract the archive contents to a directory where you would like to build the engine, e.g., C:\Unreal\4.23-vive. Make sure you use a short path, otherwise you may get errors in the next step with files that exceed the Windows length limit for file names. Alternatively, you can map your install directory as a Windows drive to reduce the path length. 2. Now navigate to the engine directory and run Setup.bat. You may need to Run as Administrator. The Setup.bat script will start downloading the required 3rd party dependencies for Unreal Engine and your system. This may take some time. Make sure that you check regularly the window for any warnings/issues. 3. The next step is to download all the required dependencies for Unreal Engine, so we need to run GenerateProjectFiles.bat to generate the Visual Studio Solution. By default, the script GenerateProjectFiles.bat creates project files for Visual Studio 2017. 4. Launch UE4.sln to open the project solution in Visual Studio. 5. In the menu bar, select Build > Configuration Manager. Verify that Active solution configuration is set to Development Editor and that Active solution platform is set to Win64. 6. In the Solution Explorer, right-click UE4 under Engine and select Set as Startup Project. This makes sure we build the Engine and not one of the other Programs that comes with Unreal. 7. Now, right-click UE4 under Engine again and, in the context menu, select Debug > Start New Instance to launch the engine. 8. Once the Unreal Engine is launched you can select the project you would like to open or specify a new project. If you are creating a new project, don’t forget to specify a project name. **There is currently an issue if you try to select a Blank Blueprint or Basic Code C++ Project where everything is black unless the mode is set to “Unlit” so instead try to select any of the other Template Projects. If you already have an Unreal Project built with a different version of Unreal Engine and you just want to swap the Engine versions, then you can try to open the Project using the Unreal Engine version that supports Foveated Rendering. To do that, find the Unreal Engine Project file, right-click on it and switch the Unreal Engine version used for that project to the new version of the engine we installed (browse to the installed path). That’s all, you should now be able to use the Custom Unreal Engine provided by HTC Vive with your project. Part 3 – Setting up SRanipal Plugin In order to optimize the rendering quality to match the user’s gaze, we need to feed Eye-Tracking gaze data to VRS. To get access to the data provided by the Eye-Tracking capabilities of the HTC Vive Pro Eye, you need to use the Vive SRanipal SDK. The SRanipal SDK allows developers to track and integrate users’ eye and lip movements, empowering them to read intention and model facial expression, create new interactions and experiences and improve existing ones exploiting the precise tracking of eye movement, attention and focus. The SRanipal SDK includes: the required runtime(SR_Runtime) which runs in the notification tray to show the current eye-tracking status for HTC VIVE Pro Eye. Plugins for Unreal/Unity along with sample code for native C development. Follow the list of steps below in order to integrate the SRanipal plugin in your project: 1. Visit the Vive SRanipal SDK page at the Vive Developer website, read the guidelines and start the download procedure. If you don’t have an HTC Developer account you will be asked to register and create a new one to be able to download the SRanipal SDK. 2. Download the Vive_SRanipalInstaller that contains the required runtime. Follow the instructions to install SR_Runtime. 3. Once installed, ensure that your Vive Pro Eye headset is connected to your PC and launch SR_Runtime.exe as an Administrator to start the runtime. Wait until you notice the SRanipal status icon that looks like a Robot appearing in the Windows notification tray. This icon’s eyes will turn orange if a headset with Eye-tracking capabilities is detected but the device is in idle mode and green if a program is retrieving eye data from it. 4. Start SteamVR (If not running already) 5. Put on your HMD. 6. The next step is to go through the Eye-Calibration Process. This is required for each new user and the calibration results are saved to the PC. To start eye calibration, press your VIVE controller’s system button and the calibration program will show an overlay window on your HMD. Select the Vive Pro button at the bottom grid of SteamVR menu. Note that for the highest level of precision, it is recommended to recalibrate for different users, as the eye positions and the pupillary distances are different for each individual. 7. You will need to read and accept the user agreement before turning on the Vive Eye-Tracking capabilities. 8. Press Calibrate to start. It will start by adjusting your HMD position. *If you have any issues with the Calibration Process and you get an error message “Initialization Failed” please follow the steps described in this troubleshooting guide. 9. Next, you need to adjust your IPD value, as shown below. 10. After that, you will be guided to do gaze calibration. Please look at the blue-dot sequentially shown at the center, right, left, upper and lower of the panel until the calibration has been successful, moving only your eyes and not your head. 11. Calibration is done. You are ready to develop eye-aware applications. Now you can try a mini-demo to light up the dots with your eye gaze or press the Vive controller’s system button to quit eye calibration. 12. Download the Vive SRanipal SDK .zip file. It contains the required plugins for each platform as well as documents with detailed instructions. 13. You will need to install the SRanipal Unreal Engine plugin in your Unreal project. To do that, copy the folder located in SRanipal SDK\v1.1.0.1\SRanipal_SDK_1.1.0.1\03_Unreal\Vive-SRanipal-Unreal-Plugin\SRanipal into the Plugins folder of your Project. If you don’t have a Plugins folder in your project structure, you can create a new one and name it “Plugins”. Then generate Visual Studio Project files again for your project. If you get any compilation issue about the Dartboard.h file that can not be included then please make the following change in the SRanipal.Build.cs file: 14. Open the Unreal project, go to Edit->Plugins and you will see the SRanipal plugin under the Project plugins. Make sure it is enabled. Now you can use the SRanipal SDK features for Eye Tracking with your HTC Vive Pro Eye. Part 4 – Combining everything for Foveated Rendering results At this point, the last thing we need is to tie everything together. We will combine the SRanipal plugin and the VRS plugin to enable Foveated Rendering by feeding eye gaze data each frame to the VRS algorithm. In Part 2 above, we used the custom Unreal Engine source code that comes with the VRS plugin. You can locate the VRS plugin folder at UnrealEngine\Engine\Plugins\Runtime\ViveSoftware\VRSPlugin. You will notice that it contains the required NVIDIA VRS APIs as well as code to easily modify VRS settings in your application. Also if you open your Unreal Engine project and go to Edit–>Plugins, you will find the Variable Rate Shading plugin under the Rendering category of the Unreal Engine plugins. Again make sure it is enabled. [UPDATE 9 Feb 2021] : If you are using the Unreal Engine branches for UE 4.24.2 or 4.23.1 then you don't need to write any extra code and you can ignore the following steps. Yo won't need to add GetEyeGazeDirectionsNormalized() and call UpdateStereoGazeDataToFoveatedRendering(), you just have to install the SRanipal runtime, import the SRanipal plugin into your game project and enable Eye Tracking in VRSSettings, then VRSPlugin will get gaze data from the engine automatically and you can just configure the settings.] In order to feed gaze data to VRS and enable Foveated Rendering, developers need to go through the following list of steps: 1. Create a new function to return the Normalized Eye Directions using SRanipal’s method GetVerboseData() and expose it to Blueprints. One way to do this is to add a new function in the list of methods found in the header file SRanipal_FunctionLibrary_Eye.h. located in Plugins\SRanipal\Source\SRanipal\Public\Eye. Of course, you can always create a new static method anywhere else in your project as long as it uses the SRAnipal module dependency. Go ahead and type in the following code for the new function GetEyeGazeDirectionsNormalized. This function will return the normalized Eye Gaze Directions for each eye. UFUNCTION(BlueprintCallable, Category = "SRanipal|Eye") static bool GetEyeGazeDirectionsNormalized(FVector& LeftEyeGazeDirectionNormalized, FVector& RightEyeGazeDirectionNormalized); Also, for the implementation of the function, you will need to type in the following code in the source file SRanipal_FunctionLibrary_Eye.cpp. bool USRanipal_FunctionLibrary_Eye::GetEyeGazeDirectionsNormalized(FVector& LeftEyeGazeDirectionNormalized,FVector& RightEyeGazeDirectionNormalized) { LeftEyeGazeDirectionNormalized = FVector(); RightEyeGazeDirectionNormalized = FVector(); ViveSR::anipal::Eye::VerboseData VerboseDataOut; bool Result = SRanipal_Eye::Instance()->GetVerboseData(VerboseDataOut); LeftEyeGazeDirectionNormalized = VerboseDataOut.left.gaze_direction_normalized; RightEyeGazeDirectionNormalized = VerboseDataOut.right.gaze_direction_normalized; return Result; } 2. Feed the Normalized Eye Directions to VRS plugin’s UpdateStereoGazeDataToFoveatedRendering function. This way, the center of the foveated region for every frame will be calculated by the VRS plugin automatically. You will need to connect the function GetEyeGazeDirectionsNormalized from the previous step to the function UpdateStereoGazeDataToFoveatedRendering from the VRS plugin during Event Tick. You can do this by creating a new Blueprint Actor and adding the following Blueprint nodes in its Event Graph. Don’t forget to place the actor in your Scene so that it can tick. Of course, you don’t necessarily need an Actor for this, you could use the same Blueprint nodes in your GameMode or your GameInstance. 3. Finally, you need to drag and drop an Actor of type SRanipal_Eye_Framework in your Scene and enable Eye tracking (tick box) on it. Only then you can get valid eye gaze directions. 4. If the VRS plugin was successfully enabled, VRS Settings will appear under the Project Settings ->Plugins category. Below you will find a list that describes what each setting can be used for. For more information, you should read this detailed article from NVIDIA. Enable VRS: Whether to enable Variable-Rate Shading or not. Enable Eye Tracking: If an eye-tracking device is properly set up and with its eye-tracker plugin enabled, checking this will automatically fetch eye-tracking data and change the center of the foveated region according to it. ScreenPercentage: In Unreal Engine, the VRSPlugin requires r.ScreenPercentage to be larger than 100 to trigger the UpScale pass renderer so VRS could take effect, that’s why it’s set to 101 by default. Foveation Pattern Preset: This property adjusts the region size of foveated rendering. There are several pre-defined region sizes, the smaller more aggressive. If you pick one of the predefined options, then the Foveation Pattern Preset Detail section will auto-fill the values for you. If you pick the Custom option as the Foveation Pattern Preset, you can customize the internal parameters to perform foveated rendering exactly the way you want. More specifically, the region size (Horizontal and Vertical Radius) for each of the available regions (Innermost, Middle, Peripheral) can be customized from a value of 0 to 10. When the radius is set to 1.0 for both the width and height, the region size will span the width and height of the window forming a circle fitting in the render target (this will depend on the aspect ratio of the render target as well). If you pick a value greater than 1 then the region will span outside the render target area. So the available options are: Narrow Balanced Wide Custom Shading Rate Preset: This property adjusts the shading rate of each region automatically according to a pre-defined rate without having to specify any numerical parameters. The available options are Highest Performance/ High Performance / Balanced / High Quality / Highest Quality. There is also a "Custom" option that allows you to define manually the shading rate for each region. The built-in shading rate preset details can be customized to: Culled: Nothing will be rendered (black) Normal Shading: Each Pixel is sampled once Supersampling (2x,4x,8x,16x): Each pixel is sampled more than once, which would result in less aliasing than Normal Rendering (but will take more computing power). Coarse Shading options (Sample once per 2×1,1×2,2×2,4×2,2×4,4×4 pixel): With coarse shading, a group of pixels is only sampled once, which would result in performance gain, but with fewer details rendered. All parameters in VRSSettings in Project Settings can be changed dynamically during a VR session or a PIE session. This means that developers can also dynamically changing the presets according to different game-dependent factors. Please be noted that the VRS configuration modified in Project Settings will not be carried to the packaged game. Therefore, a set of Blueprint functions is provided by the VRS plugin to alter them during runtime. Developers should call these functions at the initialization phase. The boolean return value indicates whether the setter function execution was successful or not. Generally, VRSPlugin will fallback to Fixed Foveated Rendering if there’s any problem with eye-tracking (e.g. invalid gaze data, device not connected, tracker module not loaded/implemented etc.) You should now be able to apply foveated rendering to your VR application and adjust shading rate and region size for either better performance or better quality according to your project requirements. Currently, there isn’t a way to visualize each region individually, e.g with a different color, but if you want to test that Foveated Rendering works indeed, you can use “Culled” for the Peripheral and Middle Regions so that only the Innermost Region is rendered. Performance Gains & Known Issues Using the Balanced option for both the Foveation Pattern and Shading Rate Presets should give you the best visual quality and performance. It performs 4x supersampling in foveal region, 1x in the middle and 2×2 coarse shading at periphery, while keeping the foveal region just large enough so that the periphery is outside the instantaneous field of view for most users. In general, performance gain from VRS ranges from 20% to 38% for static scenes and VRS gains less performance when the scene is full of dynamic objects like skeletal mesh, particle emitter, and post-processing-effects. We tested the performance improvement using some of the scenes includes in the Unreal Engine 4 sample scenes pack. SunTemple (Link) This scene was designed to showcase mobile features. This single level contains detailed PBR materials useful for a variety of graphics features and techniques and comes with many static and opaque actors as well as many post-process effects Frame time improved from 11.7ms to 9ms (~23%) with Narrow/Highest Performance preset Frame time improved from 11.7ms to 9.8ms (~16.2%) with Balanced/Balanced presets Default Scene View (NO VRS) VRS Enabled (Balanced/Balanced) VRS Enabled (Narrow/Highest Performance) RealisticRoom(Link) This scene shows off the realistic rendering possibilities of Unreal Engine 4 for architectural rendering. It utilizes physically-based Materials, Pre-calculated bounce light via Lightmass, Stationary lights using IES profiles (photometric lights), Post processing, Reflections. Frame time improved from 10.5ms to 7.8ms (~25%) with Narrow/Highest Performance presets Frame time improved from 10.5ms to 8.8ms (~19%) with Balanced/Balanced presets No VRS VRS Enabled (Balanced/Balanced) VRS Enabled (Narrow/Highest Performance) Virtual Studio(Link) The Virtual Studio Scene showcases the Unreal Engine's ability to integrate with professional quality video cards and contains high quality screen-space reflection, which is benefited by VRS a lot. Frame time improved from 38.2ms to 20.8ms (~45.5%) with Narrow/Highest Performance presets Frame time improved from 38.2ms to 26.6ms (~30.3%) with Balanced/Balanced presets No VRS VRS Enabled (Balanced/Balanced) VRS Enabled (Narrow/Highest Performance) Of course, VRS Foveated rendering is not without its own shortcomings. One of the most noticeable artifacts is magnified aliasing in the peripheral region. This artifact is more obvious for thin or glossy objects in the scene. To ease this kind of artifact, the following options are our recommendations: Use temporal anti-aliasing. Developers can choose AA method under Project Settings > Rendering > Default Settings > Anti-aliasing Method Tweak region parameters (size and resolution) based on the content. For scenes with a lot of text or glossy materials, developers should use a less aggressive setting. (UE 4.24 version) Some objects may flicker when VRS is enabled. Uncheck “Occlusion Culling” in Project Settings > Rendering can fix it. Other known issues so far: Keep in mind Bloom will not take effect unless you use the UE 4.24 version. If you use RenderDoc it may cause a conflict with VRS Plugin, so please disable RenderDoc plugin and try again. (UE 4.24 version) Typing console command may crash the editor. (UE 4.24 version) Editor viewport is affected by VRS. We support Unreal Engine 4.21.0 and 4.23.1 and 4.24.2. We injected some VRS function calls in UE rendering pipeline to make VRS happen only for certain render passes. The UpScale pass was introduced in UE 4.19. Thus, the minimum supported version will be UE4.19. If you want to learn more things about the VRS plugin code base, you should read this article from NVIDIA that describes the VRS Wrapper APIs. References What Is Variable Rate Shading? A Basic Definition of VRS NVIDIA Says New Foveated Rendering Technique is More Efficient, Virtually Unnoticeable VRWorks Variable Rate Shading (VRS) Turing™ Variable Rate Shading in VRWorks Easy VRS Integration with Eye Tracking Microsoft – Variable Rate Shading Realistic Virtual Vision with Dynamic Foveated Rendering - Tobii
- 16 replies
-
- 1
-

-
- unreal engine 4
- foveated rendering
- (and 3 more)
-
Hey @4GD when you get these errors do you see a gray screen while wearing your headsets? I got a similar output but after restarting the headset, everything was fine. Can you check?
-
Hi 4GD, what version of SRWorks are you using at the moment? You can download the latest from our website v0.9.0.3 here: https://developer.vive.com/resources/knowledgebase/vive-srworks-sdk/ SRWorks will soon be compatible with Unreal Engine 4.24 but if you want to use it now with UE 4.24 you will probably just need to change the file Plugins/SRWorks/Source/SRWorks/Public/ViveSR_UEnums.h and add 2 entries in these 2 enum classes so that they both have a NONE entry with value 0. After that you should be able to compile and build the project solution.
-
HTC VIVE presents its London Vive Developer Jam with partners Goldsmiths University of London, Department of Computing and Admix, the company behind developer community site VR/AR Pioneers. The event will take place on 24-26 January, allowing developers to experiment and create the industry’s next XR innovations. Entrants to the event can be working professionals, entrepreneurs, academics or students. For further info on registration and FAQ please go to https://vprt.co/34aG8PN. Taking place at Goldsmiths St James Hatcham, participants will be challenged to redefine how people interpret and interact with Virtual Reality, using the latest in VIVE hardware, including forward-thinking SDKs like Eye, Hand and Lip tracking. Developers can create anything from games, to art experiments to enterprise solutions. The bumper weekend will run from Friday through to Sunday, with the first night offering exclusive workshops and access to mentors including experienced developers, artists and designers from companies such as Unity, FundamentalVR, Tg0, Litho, NBC Universal and North Breeze Entertainment. Teams will then be formed for a full weekend of hacking, with the winner being announced on the Sunday evening. Corsair joins the event as the official PC hardware partner providing equipment and prizes for the winners, with other partners to be confirmed soon. Bringing together a mixture of software developers, designers, researchers and specialists to create the newest XR prototypes the Vive Developer Jam is one of the latest developer focused initiatives from Vive. “2020 marks 5 years since our very first Developer Jam in London. HTC VIVE has continued to innovate with hardware such as the Pro Eye and our latest SDK’s We’re looking forward to seeing how the developer community will continue to push the state of the art in XR. ” Dave Haynes, Director of Developer Ecosystem & Vive X, EMEA